José Luis Oliveira
Universidade de Aveiro, DETI / IEETA
3810-193 Aveiro, Portugal
jlo@ua.pt
(+351) 234 370 500
Variobox
 Exploring Human Genetic Variations
 About
AboutVariobox is a desktop tool for the annotation, analysis and comparison of human genes. Variant annotation data are obtained from WAVe, protein metadata annotations are gathered from PDB and UniProt, and sequence metadata is obtained from Locus Reference Genomic (LRG) and RefSeq databases. By using an advanced sequence visualization interface, Variobox provides an agile navigation through the various genetic regions. Researched genes are compared to the sequences retrieved from LRG and RefSeq, automatically finding and annotating new potential mutations. These features and data, ranging from patient sequences to HGVS-valid variant description up to pathogenicity evaluation, are combined in an intuitive interface to explore genes and mutations.
CitingTo cite this tool use the following publication:
Variobox: Automatic Detection and Annotation of Human Genetic Variants. Paulo Gaspar, Pedro Lopes, Jorge Oliveira, Rosário Santos, Raymond Dalgleish, José Luís Oliveira. Human Mutation, 2014
DownloadVarioBox is available for all the main operating systems (Windows [XP, 7, 8]; Linux; MacOS) that support Java. The current version of the software is 1.4.4. Click the link bellow to download:
To run, first unpack all the files to any folder. Then, if you’re on Windows, double click the Variobox file inside the folder. On Mac or Linux, start a terminal, change the directory to the created folder, and run java -jar variobox.jar
Tutorial Step 1 The initial layout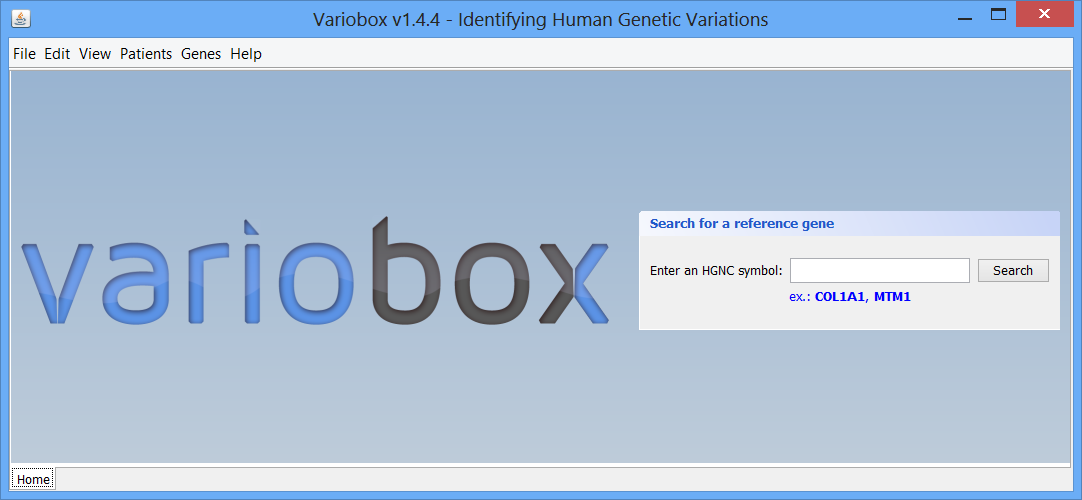 This is the initial VarioBox workspace that shows up when you open the application. At the bottom of the workspace you can find a separator, “Home”, created automatically. Here will be as many separators as searches performed, each one identified by the searched HGNC code. At the centre you can see the logo and a panel, where searches for reference genes can be performed, using a valid HGNC symbol. To work with Variobox, a reference gene is always the starting point. After obtaining the reference, a sequence can be loaded to the application to be aligned with the sequence, and analysed.
Step 2 Making a quick searchBy default there are two genes bellow the search box: Collagen, type I, alpha 1 (COL1A1), and Myotubularin 1 (MTM1). Click on COL1A1 or type it at the search box and hit search. A progress bar will show up indicating the progress of the loading process. A new tab (with the name of the searched HGNC code), like the one below, will show up once the reference gene is automatically retrieved from the web servers:
The right zone is formed by two distinct panels:
- The top one, titled Protein Viewer is where the 3D protein conformation of the selected gene is shown, if available, using JMol.
- The bottom one, titled Information Panel, which will display additional information on selected items, such as mutations and exons.
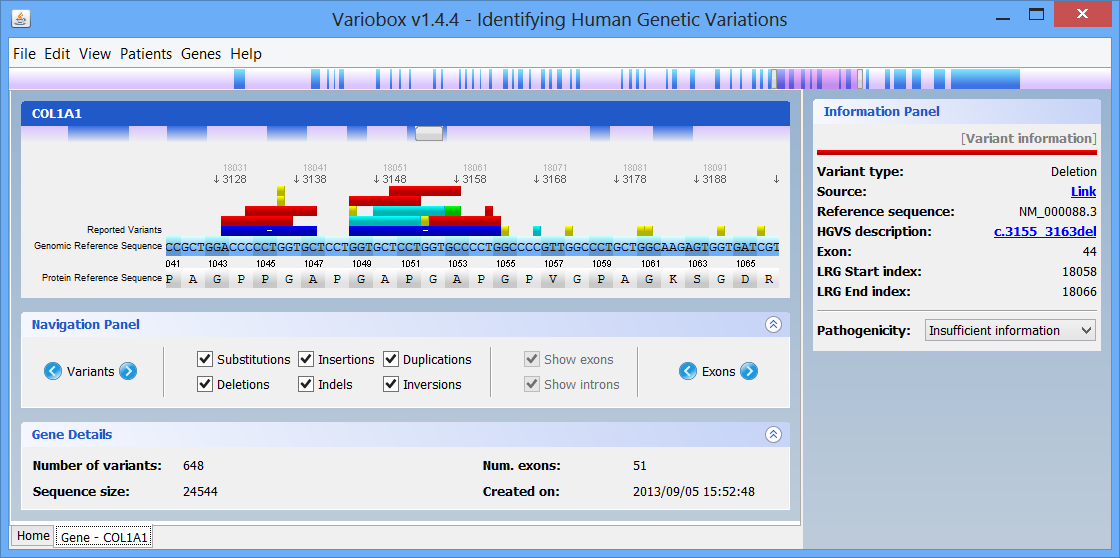
On the top of the window there is a large genomic viewer with a movable and resizable window that allows specifying a region to be explored in the centre zone. This viewer distinguishes exons (blue) and introns (purple), and allows quickly jumping through the gene. The centre zone is populated with gene data and information, in three distinct panels, described below:
- Gene panel
In this panel you can see the codon sequence and the decoded polypeptide sequence, labelled Reference Sequence and Translated Sequence respectively, and also the Known Mutations for the gene, as retrieved from WAVe. A zoomed genomic viewer is also displayed to further facilitate the exploration of the gene.

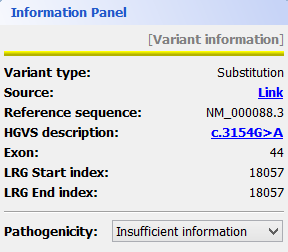
Mutations are identified by different colours, and shown next to the corresponding nucleotides. Additional information about a mutation can be obtain by clicking on the mutation. The Information Panel (right side of the workspace) will display details regarding the selected mutation’s position, source, type, annotation, etc.
- Navigation panel
The navigation panel is a simple feature that allows the easy exploration of the gene through mutations and exons. Clicking on the next or previous buttons will centre the sequence in the appropriate item (a mutation or exon):

The Navigation Panel also permits filtering what mutation types are to be shown in the Gene Panel. For instance, if you only check Substitutions, all mutations besides SNPs will be hidden.
- Gene Details panel
This panel shows you a quick information about the gene that you are analysing. The current information supported is the following:
- Number of mutations: displays the total number of mutations found in the reference gene. No information will be displayed if no mutations are known;
- Number of exons: total number of exons found in the gene;
- Sequence size: total size of the reference sequence;
- Date of creation: the date and time when this gene was created;
- Loaded files: the files that were selected by the user to be aligned with the reference sequence.

Step 3 Loading mutated sequencesTo load a gene sequence and align it with the reference gene, click the menu Genes → Load gene file. Alternatively, go to the menu File → Load gene file. You will be prompted with a new window to select the file you want to load. For the current version we support the file types:
- DNA Sequence Chromatogram File: .scf ; .abi extension
- DNA Electropherogram File: .ab1 extension
- FASTA files: .fasta ; .fa extension
After selecting the file (or files, if you choose the forward-reverse format), click Load selected file and VarioBox will read them. Once the file is correctly loaded, an alignment with the reference gene is automatically performed. This alignment will also display found mutations, as compared to the reference gene. The analysis of the loaded sequence is described in the next step.
Step 4 Analysing mutated sequences and saving resultsAfter the files are loaded, the Gene Panel will be updated with the mutated sequence as well as the calculated mutations, as depicted in the following figure:
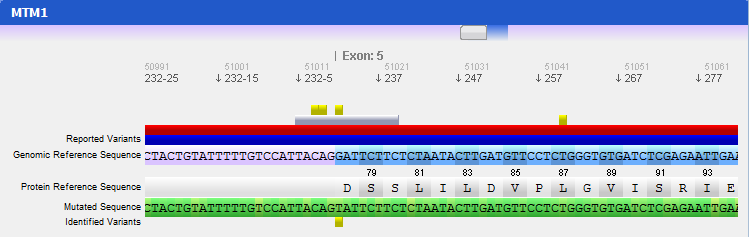
The loaded sequence will also be coloured according to its chromatogram confidence (if there is one), ranging from green (high confidence) to red (no confidence). This will allow easily understanding the validity of calculated mutations. Also note that the mutations are automatically annotated using the standard notation, and its annotation is displayed when clicking on a mutation. To save the sequences, mutations, alignment and other information, the gene should be assigned to a patient. To do so, go to the menu Genes → Save to patient and select a patient from the list of patients that will be presented.
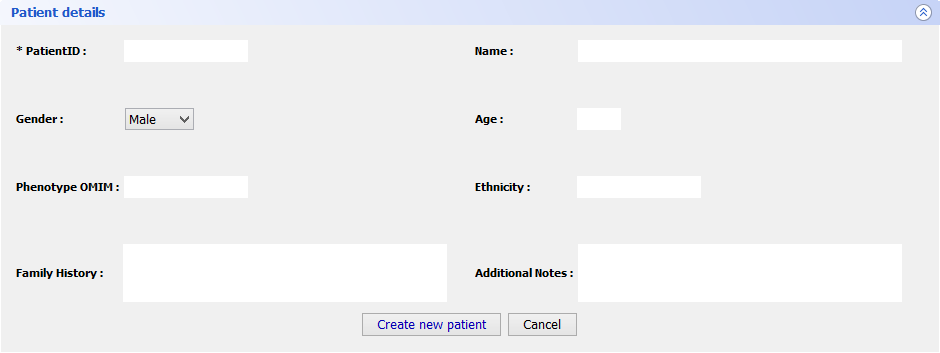
Step 5 Final FeaturesIf you want to register a new patient in VarioBox, make the following steps: Go to Patients → New patient and fill the Patient Details panel (shown bellow) with all the required information(note that only one field is mandatory). After that just click Save patient and a new record will be created.
To load a saved project, go to Patients → Open patient and select the patient you previously saved. This will create a new tab with all the patient information: patient personal information as well as the genes from that patient. Those genes can be open just by selecting them and clicking Open selected.
This action will open many tabs as many genes you have selected and will re-create all the gene panels you had in the workspace previously.
Closing tabs is as simple as going to Patients → Close patient or Genes → Close current gene project depending of the tab type you have open.